Tuesday, November 19, 2013

Cream of Chicken & Asparagus Soup - Tutorial

Back again, back again...with yet another soup! The weather, here in CO, just calls for it and I enjoy them so much that I hardly go a day without having a bowl! This soup could be easily become vegetarian as well; just omit the chicken and use vegetable stock/broth instead.


Ingredients:

350 gr Green Asparagus
2 tbsp Butter
1 Chopped onion
4 tbsp Rice (I use Arborio rice)
4 cups of Chicken Stock (I use water and a heaping tbsp of my homemade bouillon)
1 Bay leaf
2/3 cup of Milk Cream (I had sour cream so I used it)
170 gr of Chicken (cooked and cubed)
Salt & Pepper

Here are all of the ingredients, lined up and ready to go. The jar behind the sour cream is my homemade chicken bouillon. I always use it as my base for soups instead of buying broth. It's super cheap and easy to do. Find the recipe here


In a stockpot I sauteed the onions, in a bit of butter and extra virgin olive oil, until translucent.


While I was waiting for the onions to cook, at medium-low for 3-4 minutes, I washed the asparagus and cut off about 2 inches from the bottom (discard this part as it is too woody). I then sliced off the tips and put them in a small pan, with a tbsp of extra virgin olive oil, to sauté until tenter (a good 15-20 minutes on low heat). 


While the asparagus and the onions were sautéing, I quickly chopped the remaining asparagus stems in small chunks. I added the asparagus, the rice, some salt and the bay leaf to the stockpot. I stirred and cooked for 2-3 more minutes.


I then added 4 cups of water and 1 heaping tbsp of chicken bouillon and brought to a boil. I lowered the heat and simmered the soup, covered, for about 30-35 minutes.


While the soup was simmering, I checked on the tips and removed them from heat when done.  


I then proceeded to chop the chicken. I used thighs that I had seared the night before in some EVOO with some rosemary, salt and pepper. Tip: you can use leftover turkey as well. This is a great recycling recipe after the holidays, when the remnants of the celebratory dinner are ready and sitting in the fridge!


When the soup was ready, I removed the bay leaf. Don't forget this step or you'll have crunchy soup ;)


I then used my immersion blender to get the soup to a creamy consistency.


I added the sour cream (milk cream, heavy cream or half & half all work equally great) and incorporated it well.


I returned the soup to low heat and added the asparagus tips...


...and the chicken chunks...


...I gently stirred all ingredients together and adjusted with salt and pepper.


I then served it in pre-heated soup plates and used some asparagus tips and chicken cubes as a garnish.


This is a super delicious soup that lasts well for a few days in the fridge. I hope you enjoy! 


Monday, November 4, 2013

Spicy Bruxelles Sprouts & Kale Soup

I know most people steer clear of Bruxelles Sprouts, but they are very nutritious and high in protein, vitamin A, folacin, potassium and calcium. They are also relatively cheap, a bag of nearly one kilogram runs roughly $3.50 at Costco. So they are a staple in my fridge, especially during the winter months. I usually just sauté them as a side dish, but I also like them in soups. So here is a cream of sprouts that I make with those little cruciferous gems.


Ingredients:

600 gr Bruxelles Sprouts halved
100 gr Kale chopped
1 large potato (or 2 small ones) cubed
1 onion chopped
1 TBSP organic bullion 
Chilly pepper flakes
Chopped walnuts (or pecans) to garnish
Extra Virgin olive oil
Salt & Pepper

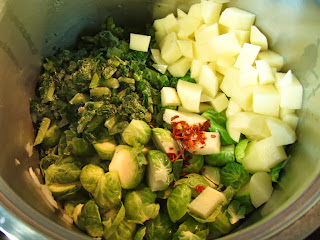
Here are all my ingredients ready to go. I had Costco's frozen chopped Kale in the freezer so, I used a full coffee mug of it instead of fresh kale. My homemade organic chicken bouillon (recipe here) is missing in the photo. I forgot to get it out until I needed it. But you get the idea; this is an easy soup that requires only a hand full of ingredients. 


I washed and cleaned the sprouts; removing any ugly/spotted leaves and cutting a little of the stem off. I then sliced them in half. I peeled, washed and chopped the potatoes. I then chopped the onion and sauteed it in some olive oil until translucent (7-8 minutes, at low heat to avoid browning).


Next I added the sprouts, the kale, the potatoes and the chilly flakes. I used 1tsp of flakes, but you can use more if you can take more heat. 


I stirred the ingredients, and cooked them for about 5 more minutes on medium-low heat.


I added 1 liter of water and a TBSP of my bouillon (stock will work just as well). I brought the soup to a boil, lowered the heat, covered, and cooked for 20 more minutes.


I then removed some of the sprouts with a colander and set them aside for garnish.


I waited a few minutes for the soup to cool off, and then used an immersion blender for a smooth and creamy consistency.


I returned the soup to heat, warmed it back up, and adjusted it with salt and pepper. I then served it topping it with some halved sprouts, chopped nuts and a sprinkling of red chilly flakes. 


If I have stale bread I chop it up roughly, and then line the bowls with it before I pour the soup in. Before serving, I always add some freshly grated Grana Padano (or Parmigiano Reggiano) for flavor. The secret with Bruxelles Sprouts is to cook them long enough to be al dente, but not allowing the glucosinolates to release sulfur as they cook. That is what causes the 'rotten egg' smell that people dislike about sprouts.

I hope you enjoy this recipe and give this wonderful veggie another try :)


Friday, October 25, 2013

Fresh Mushroom Soup Tutorial

I keep getting requests from people about my soups. So here is one more, super tested, recipe from my repertoire. A fresh cream of Champignons, made from scratch. Super easy to make and delicious too!


Ingredients:

2 Tbsp Butter
700 gr cleaned and sliced mushrooms
1 onion, chopped
3 Tbsp flour
2-3 Tbsp white whine or sherry
6 cups stock
2/3 cup milk cream
2 tbsp parsley or chives
lemon juice (optional)
salt & pepper

Here is my mise en place. In place of stock I always use my homemade bouillon and add the desired water. See recipe here


I placed the butter in a stockpot at medium heat, along with the onion, and sautéed it until translucent.


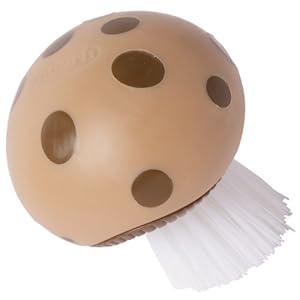
While the onions were sweating, I cleaned and sliced the mushrooms. I never wash mushrooms. That makes them slimy and icky. I have a brush (find it here) that I use to remove debris.


At this point I made a roux adding the flour and mixing quickly (away from heat to avoid clumps).


I added the wine and mixed thoroughly for a few minutes.


Once the wine was boiling, I added the bouillon and water. I used 2 tbsp of bouillon and 6 cups water.


At this point I added the mushrooms, brought to a boil, and cooked for 20 minutes on low heat.


I removed two ladle-full of mushrooms and set them aside.


After it cooled down I blended all the ingredients well with my immersion blender and seasoned it with salt and pepper.


I then brought the soup back to heat, to warm it back up without bringing it to a boil, and scooped it into small bowls, garnishing with lemon juice, the reserved champignons, some cream & parsley. 

* * * * *

This is the soup without incorporating the heavy cream, I only used some for garnishing. If you are counting calories this is delicious as-is, but if you want a richer cream of mushroom, use the 2/3 cup of cream (listed in the ingredients) and incorporate it right after blending, and before final warming.


I hope you enjoy it as much as I do! :)


Thursday, October 17, 2013

Vellutata di Zucca e Patata dolce (Cream of Sweet Potato & Pumpkin soup) Tutorial

It is getting really cold in Colorado. We even had the first snowfall the day before yesterday. This is definitely soup-time in my book (although I enjoy soup whatever the thermometer says LOL). So, today I made my MIL's favorite soup: a creamy sweet potato & pumpkin. On hand I had some Delicata squash, so I used IT as my pumpkin. I have successfully made it also with: acorn squash, pie pumpkin, butternut squash and many other type of gourd-like veggies!


Ingredients:

1 organic sweet potato or yam
1 small pumpkin or two medium squash
1 small onion (in this case 1/2 large onion)
5-6 unpeeled garlic cloves
4 cups of broth
1/2 cup heavy cream
1 tbsp Extra virgin olive oil
Salt and pepper
Chives or parsley to garnish

Cut in half lengthwise the pumpkin (scoop out seeds), the potato and the onion and brush some oil on the cut areas. Place all the veggies face down on a cookie sheet and roast at 360F for 30-40 minutes. Pierce pumpkin near the stem to check for doneness. Let the veggies cool down for a few minutes.


Scoop out the pulp of the pumpkin. Peel and chop the potato, the onion and the garlic, and place them in a stock pot.


Add the broth, a pinch of salt, and bring to a boil. Then reduce to low heat, cover, and cook for about 30 minutes - stirring every so often.


Let the soup cool down for a few minutes. Using an immersion blender, or a regular one, blend the soup to a velvety consistency.


Add the cream, adjust of salt if needed, and mix well. Return to low heat for 5-10 more minutes, taking care not to boil it.


I used this cream, but you can also use: heavy whipping cream, half & half or even Mexican cream.


Serve in warm plates, or cups, and garnish with some chopped chives (or parsley in my case) and some heavy cream.


I hope you have enjoyed this tutorial and will be making yourself some heartwarming soup soon!


Wednesday, October 16, 2013

Coffee & Coconut Scrub Tutorial

As more and more people become interested in homemade soaps and detergent, I get more inquiries about my no-soap shower detergent. I have not used traditional soap in months; ever since one of my BFFs gifted me a jar of homemade sugar scrub! She mentioned that she uses it instead of a shower gel, and I was hooked! 


Ever since we moved to CO, I've had a bad case of 'the dry skin'. I am not much of a moisturizer by nature. I am a bit of a lazy bone, when it comes to primping post shower. So this one-step oil scrub has been very welcome in my routine. I had no reservation regarding the efficacy of this product, my other BFF is a chemist and often says to me: 'the best way to clean oil is with another oil'. So I had no doubt the coconut oil was a winner. It is naturally antibacterial and antiviral, so it helps to fight the bacteria that causes bad odor, and it is a great moisturizer too. Coconut oil cleanses the skin, without stripping it bare, while the granulation of coffee or sugar helps to scrub the skin of impurities. 

I have to admit that, at first, I had my reservations. I thought 'this scrub will make the shower greasy or slippery, and the towels too'. But, after a few months, I am happy to say that it has not turned out to be as bad as I had anticipated. The amount of scrub used is minimal, so I clean my shower with the same frequency as I did before. 

So far I have stuck to the sugar scrub, but I wanted to try something new. The caffeine in this scrub has anti-cellulite properties (caffeine is a natural vasoconstrictor), plus this recipe is a great way to recycle coffee grinds - that may otherwise end up in the trash bin. I love recycling. I took a look at many recipes online and this is what I came up with, using the ingredients that I had on hand.

Ingredients:

1 heaping cup of used coffee grinds
1/2 cup of liquid raw organic coconut oil
1 tsp of Vitamin E
1 tbsp of raw honey
1 tbsp of ground cinnamon


I saved my coffee grinds for a few days in a bowl. I used espresso grinds from my moka. I let the grinds dry in an OPEN container, or they will mold while accumulating a cup-worth. I added the honey (top left), the cinnamon (bottom left) and the Vitamin E (bottom right) to the coffee grinds.


I then melted the coconut oil (for less than a minute in the microwave) and added it to the mixture.


I mixed all ingredients well, and left the bowl out to cool for a while before I transferred the mixture to a storing container.


Et voila'. The scrub is ready to be used. Coconut oil solidifies at less than 21 Celsius (70 degrees Fahrenheit) so, during the winter, it will be in a solid state in the shower. However, it melts as soon as I  rub it between my palms. I use only about a teaspoon of scrub at the time. I rub it in my hands for a few seconds, and distribute it around my body scrubbing thoroughly. I grab more as needed, to cleanse my entire body. When I am done scrubbing, I simply rinse off under the warm shower. Once out, I dry myself by patting, rather than rubbing, as I try to leave as much oil on my skin as possible. 

I hope you enjoyed this tutorial and that you will give this scrub a go either as a main component, or as a an addition to your shower-time routine!


Friday, September 13, 2013

French Provincial Desk Up-cycling Tutorial

Today's post is about a cute student's desk that we got for my DH's music room. I have begun to collect French provincial furniture pieces and I am super stoked about the way the all look! ^__^


So far I have only dealt with regular paint jobs, mostly out of laziness, but I wanted this piece to be something special for my special man. So I engaged him in a lenghty conversation regarding both color and finishes. After much deliberation, DH went for a blue-green and a distressed look. This tutorial goes through all the steps I took to achieve the final look. I began with a CL student desk. Great bones, but rough to look at. 


My first order of business, was to remove all the hardware. I knew at fist glance that this was not the original hardware, but I was not worried. Hardware it's fairly easy to find on Ebay or Etsy. However, to my great dismay, I realized that the previous owner (in order to fit those 'new' handles) had drilled a new set of holes on the drawers. The random things people do, always amazes me. LOL


So what was a gal to do? Well, I could have left them in place (the period hardware would easily cover the secondary holes) or I could fix the problem. I opted for option #2 as I am somewhat of a stickler in that regard. LOL. I got some wood filler out and proceeded to stick as much as I could inside the drilled abominations.


There is no need to be precise with wood filler...I just basically smeared the stuff on and pushed it in, as much as I could, in the crevices I wanted to patch.


I waited a full 24 hrs before I sanded the whole thing smooth. I also removed with a knife any filler that had made its way into my rightful holes. "Look ma, no holes, no holes!"


While the wood filler was drying I started working on the main body of the desk. Since the top is made of formica I made sure I sanded it, and roughed it up, quite a bit.


I then wiped the whole desk and drawers down with a TSP solution. I waited for it all to be dry and then proceeded to prime the entire piece with a spray bonding primer (Zinsser).


24 hrs later, I sanded the whole desk top down for extra smoothness - as well as all areas that had gotten too thick with primer. For the top coat, I wanted to try something new. I really like oil based paint for its thick and durable finish. But that would not have been appropriate for a distressed piece. I did not want to use latex paint, as I hate the finish, so I opted for a water based interior satin enamel from Behr in "Awning".


Here is the desk with two coats of enamel...


...I waited a full 48 hours before I begin to distress the piece using a mix of 100 and 220 grit sandpaper.  I began with the drawers as they are a smaller area and would be a good testing piece...


...and then I proceeded to distress/sand the rest of the piece. I made sure to be heavier on some areas and lighter on other. I didn't want to achieve a consistent look since wear is always random. I focused on the high points of the piece, where wear would occur naturally and, in some areas, sanded all the way through the primer and into the wood. Once I was happy with the results I stopped and wiped the whole thing down with a dry lint free rag.


Since the color was so bright I decided to tone it down with a glaze. I used a mix of 3 parts clear Martha Stewart faux finishing glaze to 1 part Martha Stewart metallic glaze in "Black Coffee".


I mixed the glazing medium together in a plastic cup and then, with a disposable brush, I began to apply it. I went with the grain of the wood, for the most part, but it was a relaxed application indeed. 


I waited a few seconds and then I begin wiping the excess glaze off with a dry paper towel.


I then followed with a damp paper towel to achieve the desired look. Some people like heavy glazing and some people like light glazing. I favor lighter glazing, so I kept on wiping until I saw what I liked.


I repeated the process through the entire piece working only on a small area at the time. The glaze remains 'open' and workable/wipeable only for a certain amount of time. After that, the glaze is set and won't be removable any longer. So I worked on smaller areas to have full control.


At this point I spray painted my hardware with my usual Rustoleum 'Rubbed Bronze'. I like to mount the handles on the back of a cardboard box for easy spraying/transporting.


...literally waiting for paint to dry! ^__^


I waited a full 48 hours for all my paint to fully cure and to make sure all was good and dry (it's been raining constantly here lately) before I applied a thin coat of furnishing wax. To apply an even coat, I put a dollop of wax into a piece of cheese cloth like so...


...and rubbed it on the pieces, with my fingers, using slight pressure. With hindsight, I should have worn gloves, as the wax melted on my fingers and I am pretty sure it's not a good for the skin -__-


After 15 minutes or so I polished the wax with a soft lint free cloth.


The wax goes on a bit hazy and gets hazier as it dries, but it does buff out very nicely. Here is a polished drawer on the right and an unpolished one on the left.


 At this point, all that was left was to vacuum the inside of desk and drawers and wipe them down to get ready for papering. I will skip instructions on this step since I have plenty of posts here and here that describe the process in detail. Once I got all the drawers lined, I installed the hardware. That's really when the piece comes together for me. Hardware for a furniture piece is just like jewels on an outfit!


So here is the final result. Sitting pretty under DH guitars collection.


Here are a few shots of details that shows the finish up close...


...and a view of the lined drawers. I love this paper! It's so oldie but goodie. It's a Dollar Tree Store find and I keep going back for more ;)


Here you can clearly see all the layers: glaze, paint, primer, some original gold paint and finally wood.


Here is a view of the small drawer. I Like how the sanding accentuated the serpentine shapes here.


And finally here is a lateral shot. I was unsure of the big distressing on the upper corner of the side panel, but after I glazed it, it all made sense. I think it turned out pretty interesting. Now let's hope DH likes it or I'll have a new painting project on my hands.


Thank you for reading and I hope you enjoyed this tutorial.